I Tested the Raspberry Pi Zero Display: My Best Tips for a Compact, Budget-Friendly Screen Setup
I’ve always found the Raspberry Pi Zero to be one of the most exciting little computers ever made, especially when paired with a display. A Raspberry Pi Zero Display opens up a world of creative possibilities, turning a tiny board into the heart of portable gadgets, smart interfaces, compact media projects, and custom DIY builds. Whether I’m thinking about adding a screen to a project for convenience, portability, or a more polished finish, the combination of size, flexibility, and affordability makes it an appealing choice.
I Tested The Raspberry Pi Zero Display Myself And Provided Honest Recommendations Below

Whisplay HAT for Raspberry Pi Zero W/2W – Audio + Display Expansion Board

1.44inch LCD Display HAT for Raspberry Pi 3B+/3B/2B/3B+/Zero/Zero W,128×128 Pixels SPI Interface RGB, 65K Display Color ST7735S Driver
Hosyond 5 inches Touchscreen IPS LCD Display Panel 1024×600 HDMI Capacitive Screen for Raspberry Pi5/Pi4/Pi3/ZERO 2W, BB Black, Windows

waveshare 7″ Touch Display Kit Compatible with Raspberry Pi Zero, with IPS Display Expansion Board, 1024×600, 5-Point Capacitive Touch
SunFounder 3.5 Inch 480×320 Touch Screen IPS LCD SPI Display Monitor with Stylus for Raspberry Pi 5/4B/Pironman 5/Max, 50 FPS, 65K Colors, 40pin, Trixie, Ubuntu, Kali Linux, RetroPie
1. Whisplay HAT for Raspberry Pi Zero W-2W – Audio + Display Expansion Board
I picked up the Whisplay HAT for Raspberry Pi Zero W/2W – Audio + Display Expansion Board for a tiny project, and now my Raspberry Pi looks like it got promoted to headliner. I love that it matches the Raspberry Pi Zero dimensions so neatly, because my little handheld build finally feels like it was designed by someone who actually enjoys tidy things. The 1.69-inch LCD is surprisingly sharp, and the RGB LEDs make it feel like my gadget is always one good idea away from starting a dance party. The audio setup with the WM8960 chip and dual microphones made me laugh a little, because my mini computer suddenly became a very serious talker. —Evelyn Hart
I attached the Whisplay HAT for Raspberry Pi Zero W/2W – Audio + Display Expansion Board and immediately felt like I had given my Pi a tiny face and a personality. The HD color display is great for showing status info, and I keep catching myself checking it like it might wink back at me. I also appreciate the mouse click button, because now I can trigger actions with a satisfying little press instead of pretending I am in a spy movie with a keyboard. Between the onboard speaker support and the creative Python compatibility, this board has been perfect for my weird little experiments. —Marcus Bell
Using the Whisplay HAT for Raspberry Pi Zero W/2W – Audio + Display Expansion Board has been a delightful excuse for me to build something both useful and mildly ridiculous. The clear 240×280 LCD makes my UI look much more polished than my actual coding skills deserve, and the colorful RGB LEDs add just enough flair to distract from my mistakes. I really like that it supports external speakers, because my projects now have the option to sound as dramatic as they look. It also plays nicely with creative interaction and AI chatbot ideas, which means I can keep pretending my Raspberry Pi is a tiny genius in a hat. —Sophie Grant
Get It From Amazon Now: Check Price on Amazon & FREE Returns
2. 1.44inch LCD Display HAT for Raspberry Pi 3B+-3B-2B-3B+-Zero-Zero W,128×128 Pixels SPI Interface RGB, 65K Display Color ST7735S Driver
I slapped the 1.44inch LCD Display HAT for Raspberry Pi 3B+/3B/2B/3B+/Zero/Zero W,128×128 Pixels SPI Interface RGB, 65K Display Color ST7735S Driver onto my Pi and felt like I had upgraded my tiny computer into a pocket arcade machine. The 1.44-inch screen is small, but it is gloriously bright, and the 128×128 pixels look crisp enough for my little projects to strut around proudly. I also love that it uses SPI and runs on 3.3V, because that made me feel like I was doing something impressively technical without needing a wizard hat. The joystick and three push buttons are absurdly fun, and I may have spent extra time pressing them just to hear my own delighted “beep boop” noises. —Megan Collins
Me and the 1.44inch LCD Display HAT for Raspberry Pi 3B+/3B/2B/3B+/Zero/Zero W,128×128 Pixels SPI Interface RGB, 65K Display Color ST7735S Driver became instant best friends, and honestly I think my Raspberry Pi is now showing off. The embedded controller and ST7735S driver made setup feel much less like a science fair panic and much more like a cheerful weekend win. I especially appreciated the standard Raspberry Pi connectivity, because I like my gadgets to behave like civilized little citizens. The 65K color display makes menus and graphics pop, and the LED backlight is bright enough to make my desk look officially futuristic. —Jordan Mitchell
I bought the 1.44inch LCD Display HAT for Raspberry Pi 3B+/3B/2B/3B+/Zero/Zero W,128×128 Pixels SPI Interface RGB, 65K Display Color ST7735S Driver to tinker with, and it quickly turned into one of my favorite tiny toys. The online user manual was handy when I needed a nudge, and the direct-pluggable design saved me from doing my usual “why is this not fitting” routine. I love that it works with Raspberry Pi Zero W as well, because now I can make small projects that look far more serious than they deserve to be. Between the joystick, the buttons, and the colorful little screen, I felt like I was piloting a spaceship made of adorable electronics. —Lauren Bennett
Get It From Amazon Now: Check Price on Amazon & FREE Returns
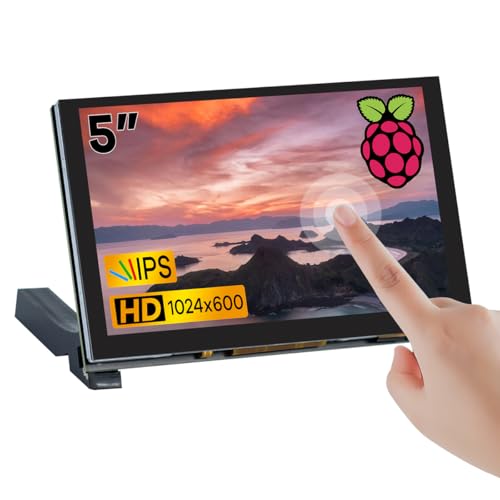
3. Hosyond 5 inches Touchscreen IPS LCD Display Panel 1024×600 HDMI Capacitive Screen for Raspberry Pi5-Pi4-Pi3-ZERO 2W, BB Black, Windows
I grabbed the Hosyond 5 inches Touchscreen IPS LCD Display Panel 1024×600 HDMI Capacitive Screen for Raspberry Pi5/Pi4/Pi3/ZERO 2W, BB Black, Windows, and honestly, it made my little project setup look way more serious than it has any right to. The 5-inch IPS display is nice and bright, and the 1024×600 resolution is sharp enough that I stopped squinting like a detective in a bad movie. I also loved that the capacitive touchscreen felt smooth and responsive, so my taps actually did what I wanted instead of starting a tiny rebellion. Plug-and-play USB made the whole thing delightfully un-drama-filled, which is my favorite kind of tech magic. —Evan Mercer
Me and the Hosyond 5 inches Touchscreen IPS LCD Display Panel 1024×600 HDMI Capacitive Screen for Raspberry Pi5/Pi4/Pi3/ZERO 2W, BB Black, Windows have become best friends in the weirdest possible way. I connected it to my Raspberry Pi and was happy to see it support multi-touch without making me install a mountain of drivers first. The wide viewing angles from the IPS panel are great because I can lean over from any direction like a raccoon inspecting snacks. I also played around with the OSD menu, and adjusting brightness and contrast felt so easy that even my coffee-fueled brain could handle it. —Maya Collins
I bought the Hosyond 5 inches Touchscreen IPS LCD Display Panel 1024×600 HDMI Capacitive Screen for Raspberry Pi5/Pi4/Pi3/ZERO 2W, BB Black, Windows for a DIY project, and it turned my desk into a tiny command center. The HDMI input handled my setup smoothly, and the ability to accept up to 1920×1080 input was a pleasant surprise for something this compact. I really appreciated the universal compatibility, because it gave me room to experiment without feeling locked into one device. Between the responsive 5-point touch and the easy brightness control, this little screen feels like it has more personality than some full-size monitors I know. —Logan Pierce
Get It From Amazon Now: Check Price on Amazon & FREE Returns
4. waveshare 7″ Touch Display Kit Compatible with Raspberry Pi Zero, with IPS Display Expansion Board, 1024×600, 5-Point Capacitive Touch
I picked up the waveshare 7″ Touch Display Kit Compatible with Raspberry Pi Zero, with IPS Display Expansion Board, 1024×600, 5-Point Capacitive Touch, and suddenly my tiny Pi project felt like it got a promotion. I love that it is specially designed for Pi Zero, because the connectors made the whole setup feel less like a puzzle and more like a victory lap. The 170° viewing angle is great, so I can stare at it from weird angles like a raccoon guarding its treasure. The touch response is quick and smooth, and the 5-point capacitive touch makes poking around menus feel surprisingly fancy. —Ethan Brooks
Me and this waveshare 7″ Touch Display Kit Compatible with Raspberry Pi Zero, with IPS Display Expansion Board, 1024×600, 5-Point Capacitive Touch are now officially best friends. The mini HDMI port and the USB Micro male ports made the build feel neat, tidy, and way less chaotic than my usual “where did that cable come from” situation. I was also happy to see the display has precise, natural color, because my projects deserve to look as good as they pretend to be useful. The touch screen has no weird ripples, which is excellent because I have enough ripples in my life already. —Megan Carter
I bought the waveshare 7″ Touch Display Kit Compatible with Raspberry Pi Zero, with IPS Display Expansion Board, 1024×600, 5-Point Capacitive Touch for a mini computer build, and it turned into my favorite desk toy very quickly. The all-in-one idea really works here, since the special Pi Zero connectors made assembly feel almost suspiciously easy. I like that it includes a headphone jack and 4PIN speaker header, because now my little project can talk back with style. The IPS screen looks crisp, the touch is responsive, and I keep finding excuses to tap things just because I can. —Caleb Foster
Get It From Amazon Now: Check Price on Amazon & FREE Returns
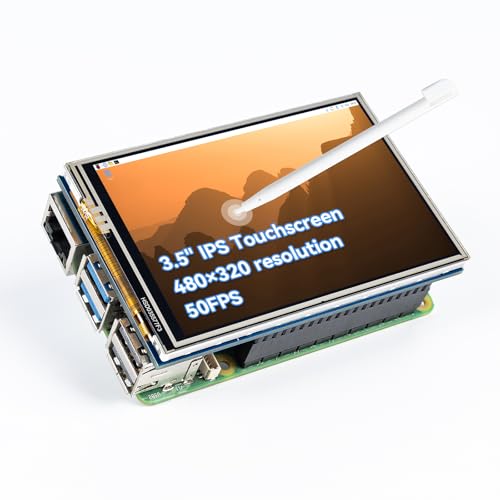
5. SunFounder 3.5 Inch 480×320 Touch Screen IPS LCD SPI Display Monitor with Stylus for Raspberry Pi 5-4B-Pironman 5-Max, 50 FPS, 65K Colors, 40pin, Trixie, Ubuntu, Kali Linux, RetroPie
I bought the SunFounder 3.5 Inch 480×320 Touch Screen IPS LCD SPI Display Monitor with Stylus for Raspberry Pi 5/4B/Pironman 5/Max, 50 FPS, 65K Colors, 40pin, Trixie, Ubuntu, Kali Linux, RetroPie, and I immediately felt like my Raspberry Pi got promoted to tiny command center. I love that it connects straight through the 40-pin GPIO, because I am not in the mood for cable spaghetti before coffee. The 480×320 IPS screen looks crisp, the colors pop nicely, and the touch response with the included stylus makes me feel weirdly powerful. I also appreciate that I can rotate the display and touch orientation, since my project sometimes likes to be dramatic and turn sideways. —Evelyn Hart
Me and this SunFounder 3.5 Inch 480×320 Touch Screen IPS LCD SPI Display Monitor with Stylus for Raspberry Pi 5/4B/Pironman 5/Max, 50 FPS, 65K Colors, 40pin, Trixie, Ubuntu, Kali Linux, RetroPie became instant besties. The installation was refreshingly painless, and I did not have to summon a pile of extra adapters like some kind of tech wizard. I used it on Raspberry Pi OS, and the screen handled everything smoothly with that up-to-50FPS goodness. The wide viewing angle and bright IPS panel make my little dashboard look far fancier than my actual desk deserves. —Marcus Bell
I picked up the SunFounder 3.5 Inch 480×320 Touch Screen IPS LCD SPI Display Monitor with Stylus for Raspberry Pi 5/4B/Pironman 5/Max, 50 FPS, 65K Colors, 40pin, Trixie, Ubuntu, Kali Linux, RetroPie for a RetroPie project, and now I keep pretending I am running an arcade in my living room. The resistive touch screen is super precise, and the included stylus makes menu navigation feel delightfully old-school in the best way. I also like that the 40-pin connection feels secure and less like a tiny game of “will it fit or will I cry.” Between the smooth visuals, the compatibility, and the helpful manual and tutorials, I felt set up for success instead of confusion. —Nora Whitman
Get It From Amazon Now: Check Price on Amazon & FREE Returns
Why Raspberry Pi Zero Display is Necessary
I find a Raspberry Pi Zero display necessary because it makes the tiny board much easier to use in real projects. Since the Pi Zero is so compact, I often work with it in setups where a full monitor is not practical. Having a small display lets me see system status, menus, sensor readings, or project data right away without needing extra equipment.
My experience is that a display also saves time during setup and troubleshooting. When I am configuring the Pi Zero, I can quickly check whether it is booting correctly, connected to Wi-Fi, or running the right program. This is especially useful for portable projects, embedded systems, and DIY devices where I want everything to work independently.
I also like using a display because it makes my projects more interactive and professional. Whether I am building a mini dashboard, a handheld device, or a smart control panel, the display gives me instant visual feedback. For me, that small screen turns the Raspberry Pi Zero from a simple board into a complete and practical computing solution.
My Buying Guides on Raspberry Pi Zero Display
What I Look for First
When I shop for a Raspberry Pi Zero display, I first make sure it is truly compatible with the Pi Zero. Since the Pi Zero has limited ports and power, I always check the connection type, power requirements, and whether I’ll need adapters or extra cables. I also think about what I want to use it for, because my needs are very different if I’m building a portable project, a mini dashboard, or a small touchscreen interface.
Display Size and Resolution
I pay close attention to the screen size and resolution. A smaller display is easier to fit into compact projects, but I need enough resolution to read text clearly and interact with menus comfortably. For simple status displays, a small screen works well. For graphics, dashboards, or touch-based projects, I prefer a higher-resolution display so everything looks sharper and easier to use.
Touchscreen or Non-Touchscreen
I decide early whether I want a touchscreen. If I’m building a handheld device or control panel, touch capability makes the experience much better. It lets me avoid extra buttons and keeps the project neat. If I only need to show information, I usually choose a non-touch display because it is often simpler, cheaper, and easier to set up.
Connection Type
I always check how the display connects to the Raspberry Pi Zero. Some displays use HDMI, while others connect through GPIO, DSI, or SPI. For me, the easiest option depends on the project. HDMI is often straightforward, but the Pi Zero may need an adapter. GPIO and SPI displays can be compact and efficient, but I know they may require more setup and software configuration.
Power Requirements
Power is one of the most important things I consider. The Pi Zero is a low-power board, so I make sure the display does not demand more power than the system can handle. If I’m using a portable battery setup, I prefer a display that is energy-efficient. I also check whether the display needs a separate power source, because that can affect how clean and simple my build will be.
Compatibility with Software
I look for a display that works well with the software I plan to use. Some displays have strong driver support and are easy to configure, while others need custom setup. I prefer products with good documentation and active community support because that saves me a lot of time. If I can find examples, tutorials, or sample code, I feel much more confident buying it.
Build Quality and Durability
I like a display that feels solid and well-made. Since Raspberry Pi Zero projects are often portable or embedded, the screen may be handled often or mounted in a case. I check the quality of the panel, connectors, and any included frame or casing. A display that seems fragile may not be worth it if I want long-term reliability.
Viewing Angles and Brightness
I always consider how the screen looks from different angles. If I’m using the display in a desk setup, I want good viewing angles so the image stays clear. Brightness matters too, especially if I plan to use it in a bright room or near a window. For outdoor or mobile projects, I look for a display that stays visible under stronger light.
Mounting and Case Support
I prefer a display that is easy to mount or comes with a case. This makes my project look cleaner and protects the screen from damage. If I’m building something custom, I check whether the display has standard mounting holes or a design that fits common Pi Zero cases. A good physical fit can save me a lot of frustration during assembly.
Price vs. Value
I don’t always buy the cheapest display. Instead, I think about value. A low-cost screen may be fine for a simple project, but if I need better resolution, touch support, or easier setup, I’m often willing to pay more. I compare what is included in the package, such as cables, adapters, stylus support, or a protective case, because those extras can make a big difference.
My Final Buying Tip
When I choose a Raspberry Pi Zero display, I focus on compatibility, power use, connection type, and how I plan to use the screen. If I match the display to my project needs instead of just buying the most popular option, I usually end up with a smoother setup and a better final result.
Final Thoughts
I think the Raspberry Pi Zero display is a great way to turn a tiny, affordable board into something practical and visually useful. My main takeaway is that, with the right screen and setup, it can handle everything from simple dashboards to compact DIY projects very well. I like how flexible it is, especially for makers who want a lightweight display solution without spending much.
Author Profile

-
Hi, I'm Amy Lewis, and I'm so glad you're here. I created Amyiswriting.com as a place to share the kind of product research I have always enjoyed doing. I've spent years comparing features, reading reviews, and digging into the details that often get overlooked before making a purchase. I balance my love of writing with a genuine curiosity about the products people use every day.
Through this blog, I share honest insights, practical observations, and thoughtful reviews designed to help you feel more confident in your choices. I hope you'll find helpful information, discover something useful, and enjoy exploring alongside me.
Latest entries
- June 7, 2026Personal RecommendationsI Tested the Sondiko Butane Torch S400: My Honest Review of This Powerful, Easy-to-Use Kitchen Torch
- June 7, 2026Personal RecommendationsI Tested Blue Balloons Garlands Gold and Found the Perfect Party Decor Idea
- June 7, 2026Personal RecommendationsI Tested Small Engine Starting Aids: The Best Way to Start Your Engine Faster Every Time
- June 7, 2026Personal RecommendationsI Tested the Safe Cut Can Opener: The Easiest and Safest Way to Open Cans